2 ways to Stop Microsoft Office Word From Showing Two Pages Side-By-Side
Table of Contents
2 ways to Stop Microsoft Office Word From Showing Two Pages Side-By-Side, Needless to say, this happens only when the document contains multiple pages. Although this is a nice feature because you can view two pages side by side at the same time, many users find it distracting. Most users, including me, want to see only one page of a document at a time, especially when writing or editing documents.
Stop Microsoft Office Word From Showing Two Pages Side-By-Side
Fortunately, Microsoft Word provides an easy way to switch from multi-page side-by-side view back to single-page view with the click of a mouse button. This is the way to do it.
Turn off the side-by-side pages mode
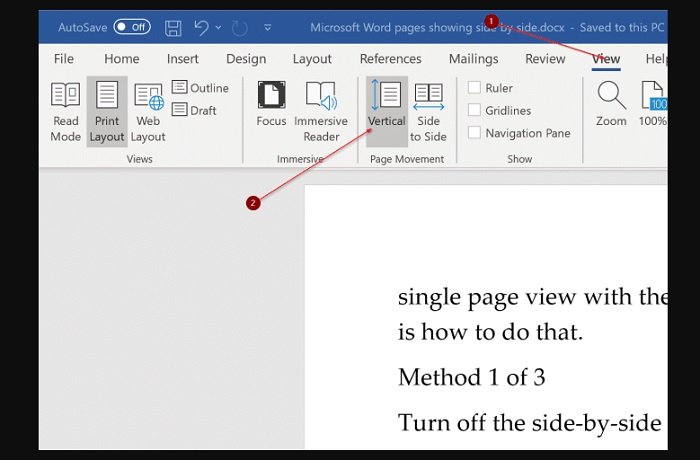
When the Word program displays two pages in side-by-side mode, click the “View” tab, and then click the “Vertical” option to quickly switch back to the default single-page mode.

Note that if you are using Word in focus mode, move your mouse cursor to the top edge of the screen to view the ribbon, including the menu name.
The best part is that Microsoft Word will remember this setting for all documents. This means that from here on, Word will always open the document in single-page mode only.
Change zoom settings
You can change the current zoom setting to 130% or 150% to exit the side-by-side mode. However, please note that you cannot change the zoom setting when viewing the document in side-by-side mode.
You need to switch back to single page viewing mode, and then move the zoom slider at the bottom right corner of the Word window to change the zoom setting.

When zooming in, the text size of the document will increase. Therefore, when you set the zoom ratio to 130% or 150%, you may need to change the text size under the Home tab.
Hope to help you !
More: You want the pdf to open with applications other than Edge? Please refer to the article on 2 ways to stop using Microsoft Edge as the default PDF viewer in Windows 10.


