How to Disable Remote Assistance in Windows 11/10
Table of Contents
How to Disable Remote Assistance in Windows 11/10. Remote Assistance is enabled by default on Windows computers, which allows anyone to access your computer remotely. Below you can find steps to disable Remote Assistance in Windows 10 and Windows 11.
Disable Remote Assistance in Windows 10 and 11
As mentioned above, the Remote Assistance feature in Windows 10 and 11 allows you or anyone else you can trust to access your computer from a remote location.
The main purpose of this feature is to allow your family or trusted technical support personnel to diagnose and fix problems on your computer, even when they are away from your device.
When Remote Assistance is not actively being used, you may wish to disable this feature to prevent anyone from attempting to gain unauthorized access to your computer.
Disable remote assistance with the run command
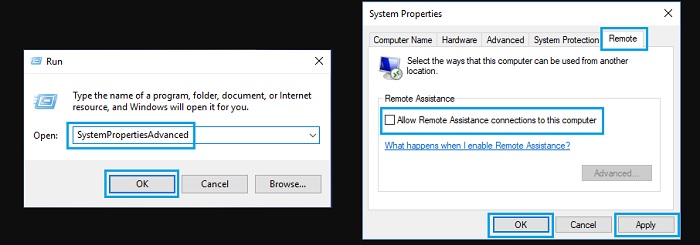
An easy way to disable Remote Assistance in Windows 11 and Windows 10 computers is to use the run command.
Right-click on the Start button and click on Run. In the Run command window, type SystemPropertiesAdvanced and click on OK. On the System Properties screen, switch to the Remote tab and Uncheck Allow Remote Assistance Connections to this computer.

Click on Apply/OK to save this change on your computer.
You can enable Remote Assistance on your computer at any time by checking the “Allow Remote Assistance” option.
Disable Remote Assistance Using Control Panel
If you prefer to use the Control Panel, you can also disable Remote Assistance on your computer by going to the System and Security section of Command Prompt.
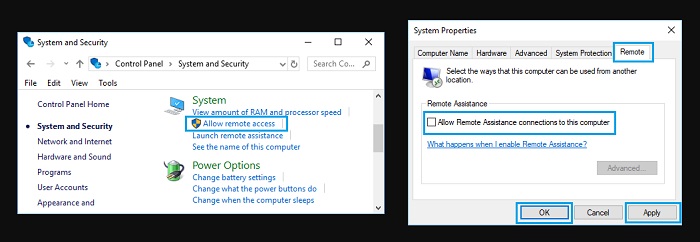
Open Control Panel on your computer. On the Control Panel screen, click on System and Security.

On the System and Security screen, click on Allow Remote Access option located under the “System” section. On the next screen, uncheck Allow Remote Assistance connections to this computer option.

Click on Apply and OK to save this setting on your computer.
Disable Remote Assistance Using Registry Editor
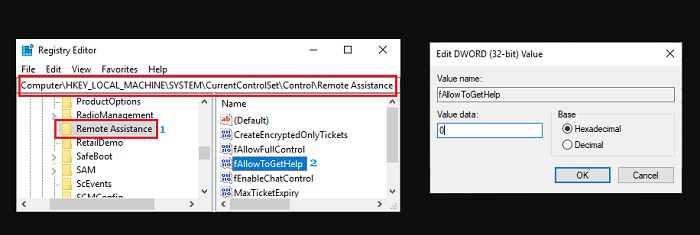
Another way to disable Remote Assistance in Windows 10 and Windows 11 is to use Registry Editor.
Type Regedit in Run Command Window and click on OK. Navigate to HKEY_LOCAL_MACHINE\SYSTEM\CurrentControlSet\Control\Remote Assistance. In the right-pane, double click on fAllowToGetHelp DWORD and change its Value Data to 0.

Restart your computer for the changes to Apply.
Now your computer will no longer allow anyone to connect to it remotely.
If you need help, you can always enable Remote Assistance on your computer by undoing the above changes.
More: Fix Recycle Bin missing in Windows 11/10.


