Fix the problem that Windows 10 computer cannot boot to BIOS
Table of Contents
Fix the problem that Windows 10 computer cannot boot to BIOS, The process of booting into the BIOS in Windows 10 is very simple and depends on the PC manufacturer. PC users may want to boot into the BIOS for one reason or another, but in some cases, they may not be able to successfully boot into the BIOS.
One of the main reasons why the BIOS cannot be accessed in Windows may be due to the faster boot process.
BIOS includes POST (Power On Self Test), which can help verify that the computer meets the requirements for proper startup. Your computer must pass the POST test, otherwise, you may hear a beep, indicating a hardware failure.
Windows 10 computer cannot boot to BIOS
If you encounter this issue, you can try our suggested solutions in the following order to see if it helps resolve the issue.
- Disable fast startup
- Use UEFI firmware settings
- Clear CMOS
- Reset BIOS settings to default
Let us look at the description of the process associated with each solution listed.
Disable fast startup
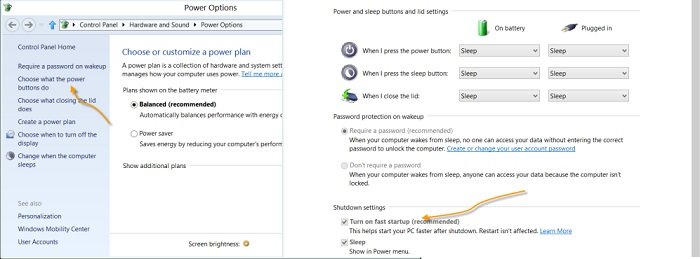
Windows 10/8 has the “Fast Startup” option enabled by default. You can access its settings here. Press Win + W keys, start typing Power, and then press Enter to open Power Options. You can learn more about such Windows search tips here. Alternatively, you can click the power icon in the notification area and select more power options.
Clicking on Power Options will open the following window. In the left pane, you will see the option: Choose what the power buttons do. Click on it.

Use UEFI firmware settings
If you cannot boot into the BIOS, but you can boot the computer into a desktop computer, you can do the following to boot into the BIOS:
- Click Start > Settings > Update & Security.
- Under the Recovery window, click Restart now.
- Click Troubleshoot > Advanced options > UEFI Firmware Settings.
- Click Restart and your PC will boot into BIOS.
Clear CMOS
If you cannot enter the BIOS setup program during the boot process, please follow the steps below to clear CMOS. You may need the service of a hardware technician.
- Turn off all peripheral devices connected to the computer.
- Disconnect the power cord from the AC power source.
- Remove the computer cover.
- Find the battery on the board. The battery may be in a horizontal or vertical battery holder or connected to an onboard header with a wire.
If the battery is in the battery holder, please pay attention to the + and – directions on the battery. Use a medium flat-blade screwdriver to gently pry up the connector without the battery.
If the battery is connected to the on-board header by a wire, disconnect the wire from the on-board header.
- Wait one hour, then reconnect the battery.
- Put the computer cover back on.
- Plug the computer and all devices back in.
Reset BIOS settings to default
The process of restoring BIOS default settings is more or less the same computer, which may be Dell, HP, Lenovo, Sony, Acer, ASUS, Toshiba, Panasonic, etc.
Start the computer, then click the “Power On” button, and continue to press the F10 key. This applies to most laptops including Dell. On HP laptops, it may be the F2 key. In the lower-left or right corner of the boot options or settings, you will see the keys for your hardware during the boot process.
You must use this key to enter the BIOS setup program.
After this is done, the BIOS options will be loaded. Remember, when in the BIOS, you must use the arrow keyboard keys to navigate.
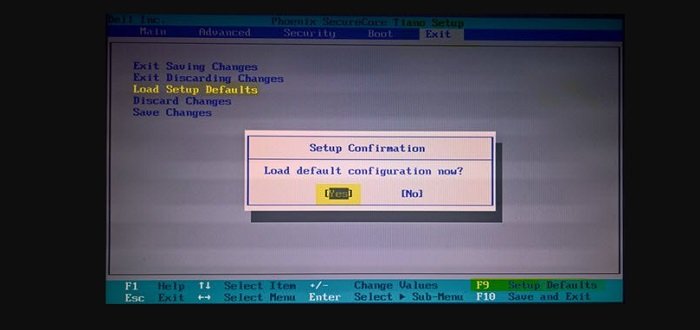
All you need to do is press the F9 key to display a blue screen that says “Load setting defaults?”. Click “Yes” to restore the default BIOS settings. Under the “Security” tab of the Dell laptop, I can also see an entry-Restore the “Security” setting to “Factory Default“. If you see it, you can also use this option. Use the arrow keys to select it and press Enter.

You can now try booting into BIOS – it should complete successfully.
Hope to help you !
More: Windows 10 Wi-fi icons have problems? refer to the article How to fix no Wi-Fi icon in Windows 10.


