Tips: Disable Windows Security Temporarily and Permanently
Table of Contents
Disable Windows Security Temporarily and Permanently, If you think the Windows security program (also known as Windows Defender) is causing problems or slowing down your computer, you can find steps below to temporarily and permanently disable Windows security.
Temporarily and permanently disable Windows security
Windows 10 comes pre-installed with its own version of the antivirus program, called Windows Security, which is usually also called Windows Defender.
However, some users have reported that the computer slows down or gets stuck due to the high RAM and CPU usage of the Windows security program.
Therefore, we provide the following temporary and permanent methods to disable Windows security on Windows 10 computers.
Temporarily disable Windows security
Follow the steps below to temporarily disable Windows Defender using the settings application on your Windows 10 computer.
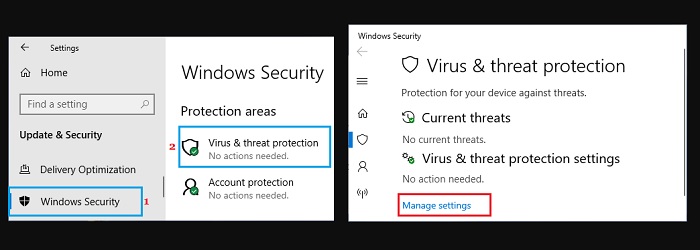
Go to Settings > Update & security > select Windows Security in the left pane. In the right pane, click on Virus & threat protection. On the next screen, click on Manage Settings Link located under “Virus & threat protection settings”.

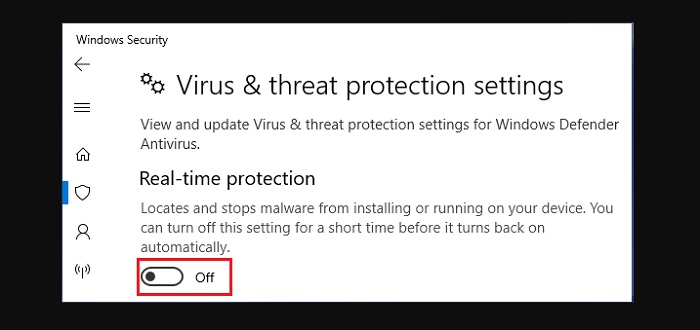
On the next screen, turn OFF Real-Time Protection, Cloud-Delivered Protection, and Automatic Sample Submission.

This method temporarily disables Windows Security Center. Windows 10 will automatically turn on real-time protection the next time you log on to your computer.
Permanently disable Windows security
If you want, you can use the registry editor to permanently disable Windows Defender on your computer. It is recommended that you create a system restore point before making any registry edits on your computer.
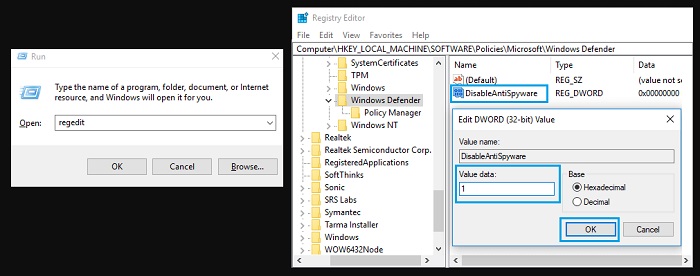
Right-click on the Start button and click on the Run. In the Run Command window, type Regedit and click on OK. On Registry Editor Screen, navigate to HKEY_LOCAL_MACHINE > SOFTWARE > Policies > Microsoft > Windows Defender. In the right-pane, double-click on DisableAntiSpyware and change its Value Data from 0 to 1.

This will permanently disable Windows Defender activity on your computer. At any time, you can enable Windows security on your computer by changing the value data from 1 to 0.
Cannot find DisableAntiSpyware
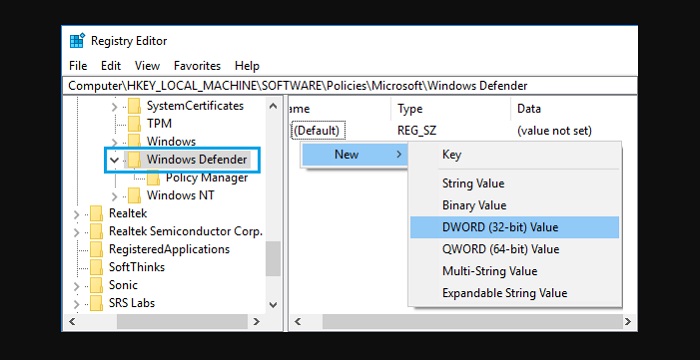
If the DWORD named “DisableAntiSpyware” is not found, you must create a new DWORD and name the DWORD “DisableAntiSpyware”.
Right-click on an empty area in the right pane > select New and click on DWORD (32-bit) Value.

Name the new Key as DisableAntiSpyware > Enter 1 in the Value Data field.
Note: Unless a third-party antivirus program is protecting your computer, it is not recommended to disable Windows security permanently.
More: Are your files and folders infected with viruses? Please refer to the article on how to scan Files and Folders for Virus In Windows 10.


