How to fix ERR_NAME_RESOLUTION_FAILED Error in Chrome
Table of Contents
How to fix ERR_NAME_RESOLUTION_FAILED Error in Chrome, The “ERR_NAME_RESOLUTION_FAILED” error in Google Chrome is usually accompanied by the message “The page may be temporarily closed or permanently moved to a new URL”.
If your Internet connection is working properly and you receive this error message, it usually means that the problem is related to changing Winsock or DNS settings on your computer.
Fix ERR_NAME_RESOLUTION_FAILED Error in Chrome
If you are dealing with the “ERR_NAME_RESOLUTION_FAILED” error in Chrome, you will find below the troubleshooting steps to resolve this issue in Google Chrome.
Clear Browsing Data
Sometimes, the problem is caused by cached error pages and cookie files in the Chrome browser’s cache that is out of date or damaged.
Open Chrome Browser > click on 3-dots menu icon > hoover mouse over More Tools and click on Clear Browsing Data. Select All Time as the “Time Range” > on the next screen make sure Browsing History, Cookies, and Cached Images are checked, and click on the Clear Data button.
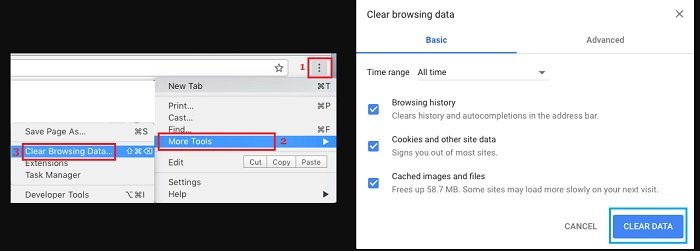
After clearing the cache and browsing history, try to visit the same webpage again to see if this error still occurs
Flush DNS & Reset Winsock
Type CMD in the Search bar > right-click on Command Prompt and click on the Run as administrator option. On the Command Prompt Window, type: ipconfig /flushdns and press the Enter key on the keyboard of your computer. Next, type: netsh winsock reset and press the enter key.
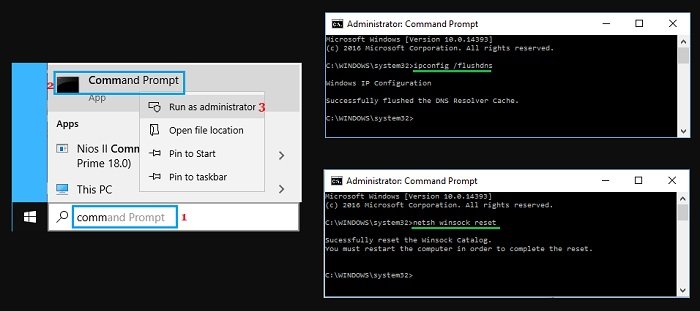
After executing the above command, close the command prompt window and restart the computer
Power Cycle Router/Modem
Before proceeding with other steps, unplug the router/modem from its power source> wait 60 seconds, then connect the router back to its power source.
After that, try to visit the website to see if you still receive this error in Chrome.
Reset Chrome Browser
The steps to reset the Chrome browser to its default settings are the same on Windows computers, Macs, and Chromebooks
Open Chrome browser > click on the 3-dots menu icon and select the Settings option in the drop-down menu. On the Settings screen, scroll down to the bottom and click on Advanced. On the next screen, scroll down and click on Restore Settings to their original defaults option.
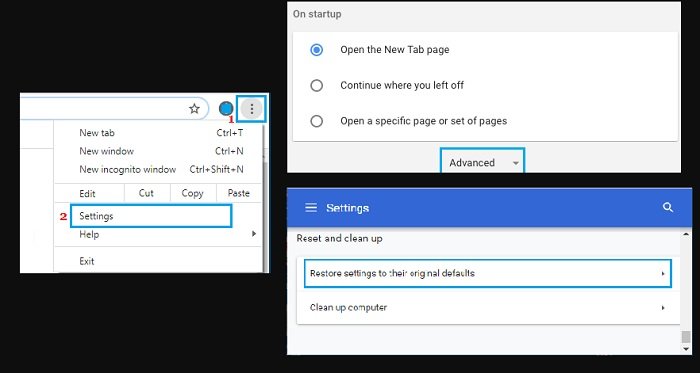
On the confirmation pop-up, click on the Reset Settings button to confirm.
Change DNS Server
If you still can’t solve the problem, your service provider’s DNS server may be unable to point to the website or temporarily blocked it for some reason.
Go to Settings > Network & Internet > scroll down in the right-pane and click on Change Adapter Options. On the next screen, right-click on the Network (WiFi or Ethernet) for which you want to change the DNS Server and select Properties in the menu that appears.
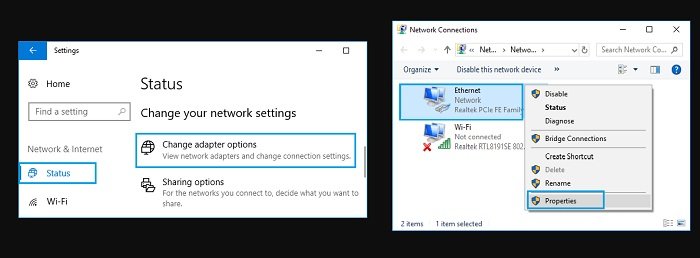
Note: If you are not currently logged in with an administrator account, you will be prompted to enter the administrator password.
On the next screen, select Internet Protocol Version 4 (TCP/IPv4) and click on Properties. On the next screen, select Use the following DNS server addresses option and enter 8.8.8.8 as your Preferred DNS Server and 8.8.4.4 as the Alternate DNS server.
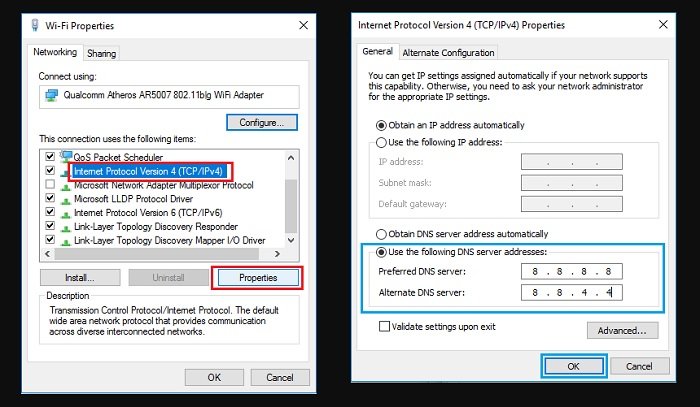
Click on OK to save the new DNS Server settings on your computer.
Restart your computer and see if you can now visit the website without encountering any errors in Google Chrome.
More: Do you want to activate windows 11 for free? Please refer to the article how to activate Windows 11 for FREE without a product key
