Fix: iPhone Not Connecting to WiFi
Table of Contents
iPhone Not Connecting to WiFi, If your iPhone is not connected to WiFi, you should be able to resolve the issue using the troubleshooting steps provided below.
iPhone Not Connecting to WiFi
iPhone can’t connect to WiFi for a variety of reasons, from minor software failures and network-related issues to other issues. Since the problem cannot be attributed to a single cause, any of the troubleshooting steps below may help you resolve the WiFi connection issue on your device.
Turn on/off WiFi
The simple operation of turning off WiFi and turning it back on is usually helpful to fix WiFi connection issues on iPhone.
Go to Settings > WiFi > move the toggle next to WiFi to OFF position.

Wait for 30 seconds and switch ON WiFi by moving the toggle to the ON position.
Restart iPhone
Another simple fix commonly used to fix network connection problems is to turn off the power and restart your device.
Go to Settings > General > Shut Down. On the next screen, use the Slider to Power OFF your device.

Allow iPhone to completely Power OFF > Wait for 30 seconds and then Restart iPhone by pressing the Power Button.
Renew a DHCP lease
This step will assign a new IP address, which should help fix the WiFi connection problem on your device.
Go to Settings > WiFi > select your Wi-Fi Network Name. On the next screen, scroll down and tap on Renew Lease option.
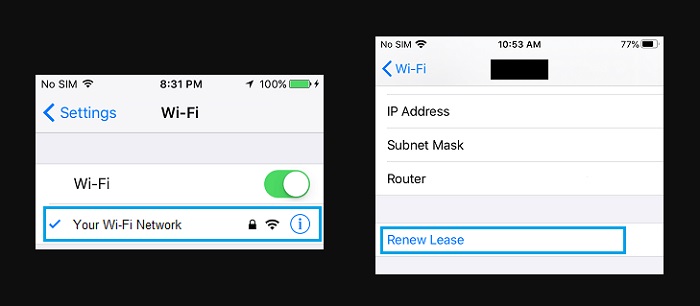
On the confirmation pop-up, tap on Renew Lease to confirm. After this, your iPhone should be able to connect to WiFi Network.
Forget the WiFi network and rejoin
Go to Settings > Wi-Fi > select your Wi-Fi network. On the next screen, select Forget This Network option.

On the confirmation pop-up, tap on Forget to confirm. Wait for 60 seconds > select your WiFi Network > enter your WiFi Network Password to join WiFi Network.
Turn off Wi-Fi assist
Turn off the WiFi accessibility feature to help users solve the problem of the iPhone being unable to connect to the WiFi network.
Go to Settings > Cellular > disable Wi-Fi Assist by moving the toggle to the OFF position.

After disabling WiFi assist, reconnect to your WiFi network and see if WiFi is now working on your iPhone.
Restart the modem/router
Power off the modem/router-use the on/off button (if available) or unplug the power cord from the wall outlet.
The above steps reset the WiFi network, assign a new IP address to your iPhone (if needed), and fix most WiFi connection issues.
Reset network settings
Before performing this step, make sure to write down your WiFi network password, as it will be deleted.
Go to Settings > General > Reset. On the next screen, select the Reset Network Settings option.

On the confirmation pop-up, tap on Reset Network Settings again confirm.
After that, connect your iPhone to your WiFi network and see if the problem of the iPhone being unable to connect to WiFi disappears.
Switch to Google DNS
If you frequently encounter network connection problems, the problem may be that your Internet service provider’s DNS server is busy or experiencing problems.
In this case, switching the DNS server on the iPhone to Google or OPEN DNS can help solve the problem.
Go to Settings > WiFi > select your WiFi Network. On the next screen, scroll down and tap on Configure DNS option. On Configure DNS screen, switch to Manual option and tap on Add Server.
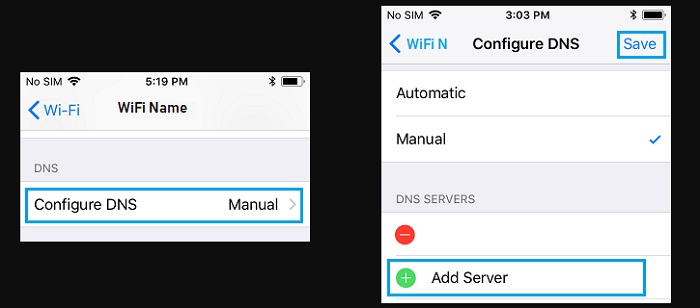
Type 8.8.8.8 and tap on Add Server > type 8.8.4.4 and tap on the Save option. After adding Google DNS Servers, you can delete the DNS Servers of your service provider by tapping on the Red Minus icon.
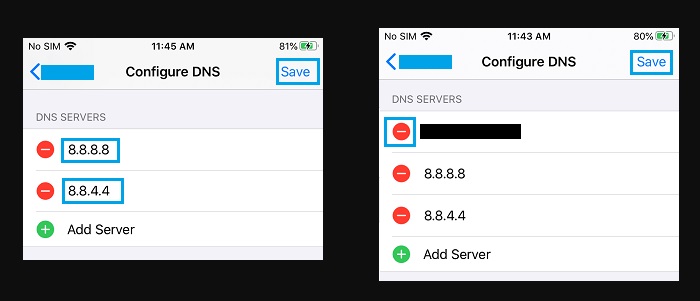
After deleting your service provider’s DNS Servers, make sure you tap on the Save option to save this change on your device.
Note: Type 208.67.222.222, 208.67.222.220 in case you want to switch to OPEN DNS.
More: How to Fix Force Quit Not Working on Mac.
